One of the greatest things about small batch brewing is the decreased need for large quantities of supplies and space. However, there are some items that will make your brew days much more enjoyable! In this article, I will go through the necessary supplies to brew extract and brew-in-a-bag (BIAB) batches and supplies that may not be necessary but will make your life easier! Let’s discuss the supplies you’ll need for 1 gallon homebrewing! Whether you will be apartment brewing, are low on space, or simply want to brew more often, these are the items you will need.
Necessary Supplies
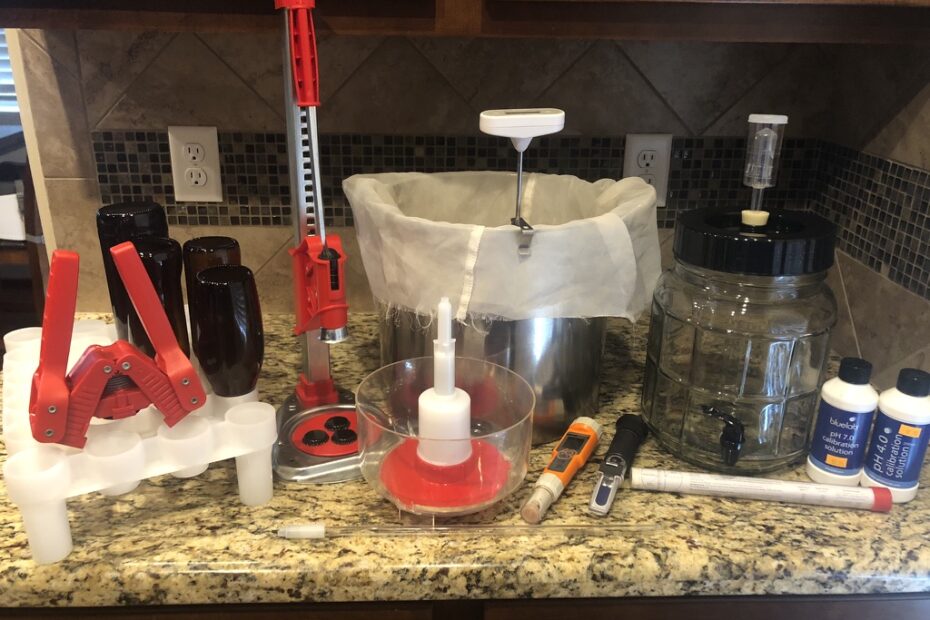
1. Brew Kettle
The item that most probably think of first when starting to homebrew is the brew kettle. Kettles are generally made out of aluminum or stainless steel. Aluminum is a better conductor of heat, so it will heat and cool more quickly than stainless steel. However, aluminum does oxidize, so you are unable to use oxygen-based cleaners on them.
For 1 gallon brewing, you can get away with a smaller kettle than normal, but in case you may want to do larger batches later, I would recommend getting a 20qt. size kettle as price is not that much greater than a smaller one.
Some kettles do come with a spigot near the bottom of the pot, this can make sparging much easier and more efficient!
Link to 20qt Stainless Kettle
2. Thermometer
This will be used to measure your temperature during steeping grains or your mash, as well as during the cooling phase. The floating glass thermometers do work, but I have had two of these break throughout the years. My preference is a quick-read digital thermometer.
I personally use the ThermoWorks Heavy Duty Waterproof Thermometer
However, I know many people have good success with this quick-read style of thermometer as well.
3. Sanitizer
There are a couple different options for sanitizers, but the biggest differentiating factor is the need to rinse after use vs. no rinse sanitizers.
Bleach is by far the cheapest option, but you do need to rinse thoroughly after use. This fact alone is a dealbreaker for me as I like the brew day to be as efficient as possible.
The two main options for no-rinse sanitizers are iodine based sanitizer (Iodophor) or acid-based sanitizer (Star-San). The biggest difference between these (aside from color) is the contact-time needed to achieve sanitization. Iodophor needs about 2 minutes of contact time; whereas, the Star-San only needs 30-60 seconds. This makes Star-San my sanitizer of choice.
Link to Star-San 32oz. Bottle
4. Fermentor
This is the vessel that you will be putting your wort into after you have boiled and cooled it. The classic one gallon carboys (think a double-sized Growler) can suffice if that is all you can afford; however, I have had good success with the glass fermenters that have a spigot attached, as linked to here.
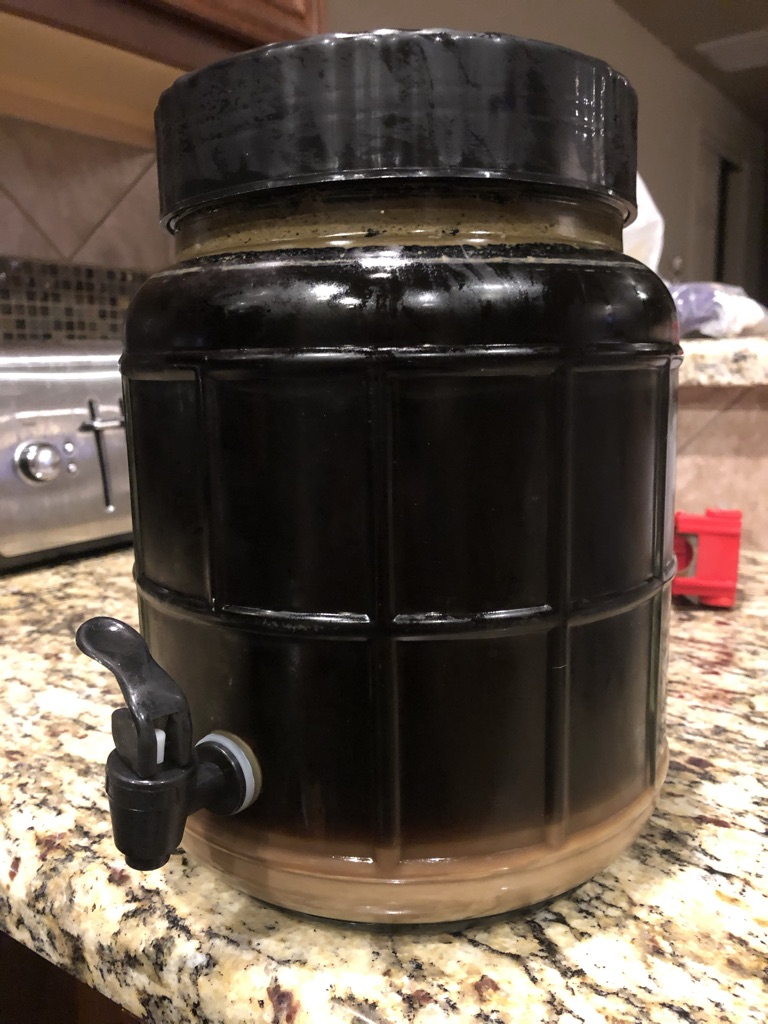
The reason I like this is because once fermentation has completed, I can simply attach a bottling wand to the spigot and bottle directly from there. Time savings!
The ultimate small batch fermenting vessel in my opinion would be this stainless option, however, you are not able to watch the fermentation process happen in this case!
5. Brewing Spoon/Mash Paddle
This will be used to break up clumps in your grain during a brew-in-a-bag process and/or to help stir in extract during the boil. You don’t need to get too fancy here. Generally, these are made out of either plastic or stainless steel. Really personal preference in this case!
Inexpensive stainless spoon
6. Muslin Bags
These bags can be used to add steeping grains, add hops either during the boil or dry hopping, or add special additions (such as cacao nibs, vanilla beans, peppers, etc.). I would recommend picking up a few of these to have on hand at all times.
Muslin Bag (10 pack)
7. Hydrometer
A hydrometer is a tool used to measure specific gravity, or in other words, the density of a liquid. This specific gravity is measured before fermentation (original gravity) and after fermentation (final gravity). Throwing these numbers into a calculator will give you your alcohol by volume (ABV). Without a tool to measure specific gravity, you will be unable to know your ABV or check to insure that fermentation has completed.
Hydrometer on Amazon
8. Colander (BIAB)
This will be used in the sparging process during a brew-in-a-bag batch. As stated in my ‘how-to’ article, I highly recommend spending the time and money to find a colander that fits very well with your kettle. Trust me, you do not want a colander (or three, really…) with a bag of soaked grains falling into your wort and splashing all over. I will link to the colander that I found to fit my kettle perfectly here.
9. Grain Bag (BIAB)
This is the large bag that you will put your grain into while doing a brew-in-a-bag batch. These are generally more durable than the muslin bags discussed above and are meant to be reused. Some have drawstrings, which can make removing the bag from the mash water slightly easier.
Grain Bag with drawstring
10. Second Large Pot (BIAB)
This is simply just another large pot that you will use to heat up your sparge water. This may be something you already have in your kitchen cabinets. Material is not as important with this pot as you will just be heating water with this pot. I recommend using a pot that has at least a 2 gallon capacity.
11. Bottles
Unless you are coming into the homebrewing hobby with a large amount of money to spend, you will likely package your beer in bottles. You can certainly start out by buying a 24-pack of bottles from your local homebrew shop; however, as you will be brewing small batches, you don’t need all that many bottles to get started. I would highly recommend just starting to save some of the bottles from commercial breweries that you are routinely drinking. If you’re interested in an easy way to remove labels from bottles, please click here.
12. Bottle Capper
This is what you will use to cap your beers. There are two main styles of cappers: the wing capper (handheld) or a bench capper.
Advantages of a wing capper include portability and less room needed to store it. I have noticed a disadvantage is that they can struggle with the short stubby bottle type that Sierra Nevada uses, for example.
Advantages of a bench capper include that it should be able to cap any type of bottle well. However, as noted above, it does take up significantly more room than a wing-style capper.
I have personally gone back to using a wing-style capper from a bench capper.
Wing-Style Handheld Capper on Amazon
Bench Capper on Amazon
Supplies That Will Make Your Brew Day Easier
These are items that generally won’t break the bank but will make your brewing experience much more enjoyable. You can make great beer without these items, but consider slowly adding these to your arsenal as you get more batches under your belt!
13. Digital Scale
Once you move to creating your own recipes, a digital scale is extremely valuable. This allows you to measure out precise amounts of grain, hops, and other ingredients. For one gallon batches, often you are only adding 0.1-0.2oz of hops, having a scale allows you to measure these amounts accurately and precisely.
Digital Scale on Amazon.com
14. Refractometer
A refractometer is another tool that is used to measure specific gravity. As noted before, it is necessary to measure your original gravity and final gravity to calculate ABV as well as to insure that fermentation has completed.
The biggest difference between a refractometer and a hydrometer is the volume needed to obtain a reading. If you are using a hydrometer, you generally need between 4-8oz of fluid to get a reading. With a refractometer, you can take just 1mL (0.03oz) of wort/beer to get a reading.
Refractometer on Amazon
15. FermCap-S
This is a product that can be used to significantly decrease the risk of a boil-over during the brewing process. Another side benefit is that it can help to decrease krausen produced during fermentation. This is a very inexpensive product that has my brew days much less stressful (and my wife happier without sticky wort on the stove)! 1-2 drops in a 1 gallon batch works great.
FermCap on Amazon
16. Spray Bottle filled with Star-San
This is another very inexpensive addition that can make brew days and bottling days significantly easier. Simply get a spray bottle from your local hardware or department store and fill with the proper ratio of Star-San. There will always come a time during your brew day where it will be handy to simply spray something to quickly sanitize it.
I am very confident in your ability to find a spray bottle without me linking to one!
17. Bottle Rinser/Sanitizer
This is used to quickly sanitize bottles after cleaning them. Use of this item has given me more confidence that bottles are sanitized correctly and made the process more efficient. You simply fill the basin with the correct ratio of Star-San and then pump the bottle a couple times on the sanitizer and you are done!
Bottle Rinser/Sanitizer on Amazon
18. Bottle Rack
This bottle rack will be used during cleaning and sanitizing the bottles prior to bottling. I have used both racks and bottle trees. I have found the racks are easier to work with, and I like that there is not any piece of plastic that actually goes into the bottle after cleaning or sanitizing as there is with a bottle tree.
Link to Fast Rack
19. Thermometer for Fermentation Area
I recommend having a thermometer to test the ambient temperature in your fermentation area. It is very helpful to know if your fermentation region is too hot or cold before a beer either does not start fermentation or gets off-flavors from being too warm. I’ll be quite honest, we initially bought this thermometer for monitoring temperatures in our babies’ rooms, but its use has doubled nicely for homebrewing!
Remote thermometer on Amazon
20. pH Meter
A pH meter is used to measure the acidity vs alkalinity of a solution. Being able to measure pH of your mash helps you take the next step in the quality of the beers that you brew. It allows you to dial in the perfect pH for the specific style of beer that you are brewing and let the correct enzymatic reactions happen. Use of a pH meter vs pH strips is much more reliable and precise. It is also important to pick up calibration solutions for your pH meter to make sure that the results you are obtaining are accurate. Side note: a pH meter’s use in kettle souring is invaluable!
Link to pH Meter
Link to Calibration Solutions
I did post links to sites on the internet for ease of shopping, but I would highly recommend visiting or contacting your local homebrew shop to pick up the majority of these items. The relationship that you will establish with your local homebrew shop owner or employees can prove to be extremely valuable later on, especially once you start to develop your own recipes.
If you enjoyed this article and are ready to start the homebrewing process, please see my how-to articles linked below!
How to Brew-in-a-Bag
How to Brew an Extract Batch