The gose is a refreshing, tart German beer! It’s become fairly popular within the US in the past several years, and for good reason! The gose makes for a great base to get creative with. In this article, I’ll walk you through my prickly pear hibiscus gose recipe.
What is a Gose?
The Gose gets its name from the Gose river that flows through the town of Goslar.
It is pronounced ‘GO-zuh’ and is different than the style gueze, which is pronounced ‘gooz’.
Gose is a historical style that was first brewed over 1000 years ago. Whether it was salinity from the brewing water itself or salt from nearby salt-mines that was added to produce better mouthfeel, one of the qualities that makes the Gose unique is its high salt content.
The grain bill for the Gose utilitizes a large amount of wheat, at least 50% and some early versions were 100% wheat. This style has always been sour to some degree. Evidence suggests that early versions were spontaneously fermented, meaning yeast was not added on purpose. However, when brewed today, specific bacteria is often added for a controlled souring experience.
Gose are not strong beers, falling in the 4.2-4.8% range according to the BJCP. Gose should also be just very lightly hopped. Early gose likely did not even have hops specifically added, and instead used a blend of other spices for the balancing bitterness.
The low bitterness, mild strength, tartness, and just enough salt and coriander notes make this an extremely refreshing beer. I, for one, am super happy that this beer has become as popular as it has in recent years!
Those of you that follow this page know that I like to include the BJCP (Beer Judge Certification Program) guideline if it’s available. The 2015 BJCP Overall Impression for Gose reads as follows “A highly-carbonated, tart and fruity wheat ale with a restrained coriander and salt character and low bitterness. Very refreshing, with bright flavors and high attenuation”.
If you’re a reader like myself, I cannot recommend “Gose: Brewing a Classic German Beer for the Modern Era” by Fal Allen enough. Most of the historical information from this article stems from this book. This book dives deep into the history of gose, how to brew a great gose, and is a perfect resource for learning how to kettle sour.
How to Brew a Good Gose
Let’s talk about how to brew your best gose by looking at the ingredients one by one.
Water Profile:
The largest ingredient by far, fortunately, does not have to be all that much different than your typical brewing water. I recommend using a similar balanced water profile to most of your light beers. Obviously, a large part of what makes the gose unique is its salinity. You will want to add a small amount of salt to the beer; however, keep a light hand, you don’t want your brew tasting like a salty mess.
How Much Salt to Add?
I have found that about 0.4 oz (11.3 grams) per 5 gallons of your favorite salt gives you the mouthfeel you’re desiring without being overpowering in your gose.
I recommend adding the salt near the end of the boil and not prior to mashing.
Grain Bill:
The grain bill for the gose is surprisingly simple. As mentioned earlier, wheat makes up a large part in the gose. Most brewers find that equal parts of barley and wheat make a great gose. Some prefer just a slightly higher percentage of wheat.
I prefer to use the clean Pilsner malt for the barley portion of the grain bill.
It is important, especially when using a mash tun that is taller than it is wide, to utilize rice hulls in your mash. As wheat is huskless, it makes lautering difficult if adequate rice hulls are not present.
Acidulated Malt- The use of acidulated malt can aid in the kettle souring process. This malt should be added towards the end (last 15 minutes) of the mash. This helps to decrease the pH prior to the actual kettle souring process.
Hops:
Hopping should be performed with a light hand when brewing a gose. You want to shoot for 2-15 IBUs. Use of german hops with mild bitterness would be most traditional.
Keep in mind that hops are naturally anti-septic. Almost always a good thing, but if you will be purposefully inoculating your beer with bacteria, keep in mind that hops and bacteria are not great friends. When kettle souring, the hops are added in the second boil once the desired acidity is produced by the bacteria.
Yeast:
Use a yeast that is fairly clean and neutral. Yeast character is not where the gose shines. I have had good success using Safale US-05 in my kettle sours, including the gose. However, a clean German ale yeast would be arguably more traditional.
You will want to consider pitching more yeast than usually necessary for a five gallon batch. After kettle souring, the wort will be much more acidic than normal. Yeast are not extremely happy with acidic conditions, so you will want to make sure that your yeast of choice is fairly tolerant to acidic conditions and set it up for success by pitching more than normal.
Coriander:
The addition of coriander gives the gose a mild citrusy aroma and flavor. However, if you’ve ever brewed with spices, you likely know that a little can go a long way! As with the salt addition, keep the coriander light. I also recommending using the freshest coriander you can find to avoid potential off-flavors.
How Much Coriander to Add to Gose?
0.25oz (7.1 grams) of coarsely crushed coriander is a good amount for a 5 gallon batch of beer.
Kettle Souring:
Kettle souring is my preferred method to producing quality sour beer in a controlled manner. There are other ways to produce sour beer, but it is tougher to control the final acidity and potential off-flavors using these methods.
I will walk through the kettle souring process in the directions just below the recipe. If you would like a full run-down on how to kettle sour, please follow this link for my comprehensive kettle souring article!
How to Add Prickly Pear to Beer:
As with many things in life, there’s an easy way and a hard way. However, the ‘hard’ way with prickly pear involves walking through a warm/hot desert extracting fruit from thorny plants that perform CAM photosynthesis. Despite growing up in Southern Arizona, I have yet to harvest prickly pear this way unfortunately. If you are interested in this adventure, however, I would recommend checking out this page for advice!
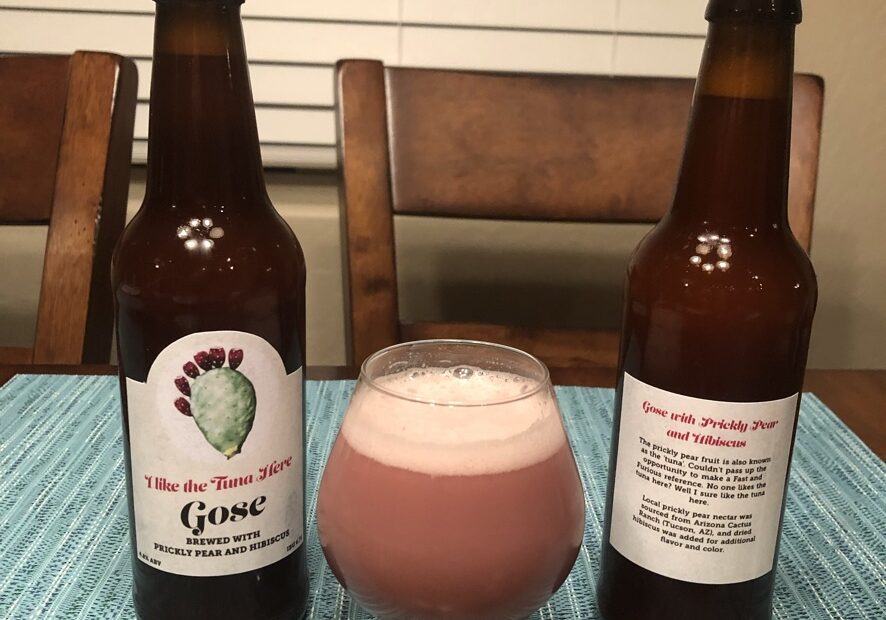
Since I was outside of the desert when I brewed this beer, I chose to go the easy route and purchase prickly pear nectar from Arizona Cactus Ranch down near my home town.
This company has a solid reputation throughout Arizona, and the nectar they distribute has a wide variety of uses. So, why not add it to beer?
I recommend adding the nectar, fruit flesh, or juice to your secondary fermentor. If using the fruit itself, I would recommend the double freezing technique discussed in my Raspberry Berliner Weisse recipe article.
If using nectar or juice, simply add to a sanitized secondary fermentor and rack your beer on top. I would recommend letting the beer sit in secondary for at least a week to make sure that any sugar within the nectar/juice has been consumed by the yeast.
If you are kegging, the nectar can be added directly into your keg. This is helpful if you’re short on time. I have had success with doing this in the past.
I honestly do not know how much sugar content the nectar/fruit of the prickly pear contains. On the nectar product, it states ‘no sugar added’ and lists zero carbohydrates contained within the nectar.
How to Add Hibiscus to Beer:
Hibiscus flowers add a beautiful pink/red color to beer. In addition, they also lend floral, fruity, and sometimes berry like aroma/flavor to your beer.
Hibiscus can be added to beer at multiple stages either towards the end of the boil or in the fermentor.
The flowers can be steeped in hot water, and then added to your secondary fermentor or the dried flowers can be added just like a ‘dry-hop’ addition.
The flavors and aroma that you will get from these various methods will differ. You will extract more of the color from the flower by adding the flower to the end of the boil or by steeping the flower in hot water before adding to your fermentor.
On the other hand, if you are trying to obtain as many of the delicate aromatic notes that the flower can lend, putting whole hibiscus flowers into your fermentor after active fermentation has subsided would be the best method.
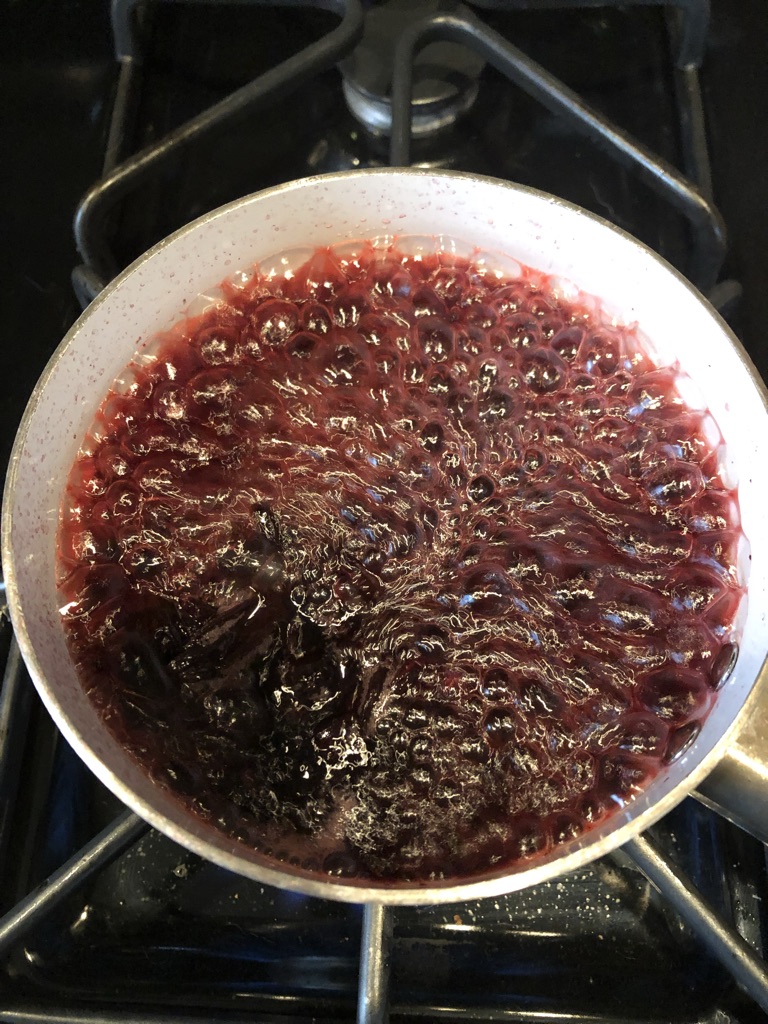
For this particular beer, I chose to boil the dried hibiscus flowers in a pot of water for about 10 minutes. I then let that ‘hibiscus tea’ cool and added to the secondary fermentor along with the prickly pear nectar.
Let’s get to the recipe! This recipe is for a 5 gallon (18.9L) batch, but it can easily be scaled up or down depending on your desires.
Prickly Pear Hibiscus Gose Recipe
Stats:
Volume: 5 gallons (18.9L)
Predicted SRM 3.41
Predicted IBU 6.71
Original Gravity 1.045
Final Gravity 1.008
ABV- 4.8%
Grain:
6lb (2.72kg) Pilsen
4lb (1.81 kg) American Wheat
4oz (113.4 grams) Acidulated Malt (last 15 minutes of mash)
6oz (170.1 grams) Rice Hulls
Hops:
0.2oz (5.7 grams) Centennial (40 minutes)
Other Additions:
0.4 oz (11.3 grams) Pacific Sea Salt (7 minutes)
0.25oz (7.1 grams) Coriander (crushed with spoon) (7 minutes)
3 Good Belly Mango Plus Probiotic Shots
15oz (425.2 grams) Arizona Cactus Ranch Prickly Pear Nectar
1oz (28.3 grams) Hibiscus Flower
Water:
Flagstaff Tap Water
1/4tsp (0.86 grams) CaCl
1/8tsp (0.5 grams) Gypsum
12mL Lactic Acid (adding just before kettle souring)
Yeast:
Safale US-05– 2 packets
Directions:
Calibrate pH meter. Heat strike water to 163°F (72.8C). Add calcium chloride and gypsum, do not add salt at this point. Mill the grains and mix with strike water to reach a mash temperature of 152°F (66.7C). Hold mash temperature for 60 minutes. Add acidulated malt during last 15 minutes of mash. Sparge the grains with 170°F (76.7C) water. Boil for 15 minutes to sanitize wort and kettle. Cool wort to 95°F (35C). Decrease pH of wort to ~4.5 with lactic acid (will likely require 10-15mL lactic acid). Pitch bacterial culture of choice. Purge headspace of kettle with CO2 and cover with sanitized saran/plastic wrap to exclude oxygen. Hold temperature at 95°F (35C) for 12-72 hours until desired pH is reached (3.3-4).
Once desired acidity is reached, bring wort to a boil. Boil for 60 minutes following hop schedule. Add salt and crushed coriander towards the end of boil. After the boil has completed, chill the wort to slightly below fermentation temperature, about 64°F (17.8C). Aerate the wort and pitch the yeast. Ferment at 65-70°F (18.3-21.1C) for 2 weeks. Obtain prickly pear nectar and dried hibiscus flowers. Steep hibiscus flowers in boiling water for 10 minutes. Cool ‘hibiscus tea’. Add hibiscus tea (including flowers) and prickly pear nectar to sanitized secondary fermentor. Rack beer on top and let rest for 1-2 weeks, then cold crash the beer to 35°F (1.7C). Bottle or keg the beer and carbonate to approximately 3.0 volumes of CO2.
Tips:
Getting Creative
As stated above, the gose makes for a spectacular base beer to get creative with. Ideally, you could brew a five gallon batch and ferment each gallon with a different set of fruits or spices. How this particular recipe came about was that I had about 1 gallon of gose left in my keg. I had thoroughly enjoyed the base beer up to this point, but I wanted to have a little fun with it. I ended up adding the hibiscus and prickly pear nectar directly to the keg, and this beer was born!
Measuring pH
Accurately measuring your pH when brewing a kettle sour is very important. Yes, you could in theory just base the desired acidity off of your personal taste. However, even prior to the actual kettle sour step, it is important to decrease pH to a level where other organisms’ growth is inhibited.
At the very least, I recommend purchasing pH strips that go down to the 3-5 range. Many strips you will find measure pH only above about 6.
Purchasing a quality pH meter will make your kettle souring adventure much more enjoyable.
Bacterial Culture Choice
There are several different bacterial pitches that you can purchase to produce the desired acidity for this beer.
I have had great success with using Good Belly probiotic drinks to inoculate my wort with the desired bacteria. I have used both the probiotic ‘shots’ as well as the drink that comes in a carton. These are fairly accessible at most health food stores and have produced consistent results for me. I generally get to a pH of about 3.5 within 12-24 hours.
Companies like White Labs produce different lactobacillus cultures for the sole purpose of kettle souring. I’ve talked to brewers that have enjoyed using these options as well.
Some brewers have even pitched yogurt to get the bacteria they were desiring!
Whatever you do, please do not be the brewer who makes their sour by adding a boatload of lactic acid. I can’t argue with the ease of doing this, but the quality of your flavor will be significantly less than if you had done a proper kettle sour!
Thank you for stopping by!
If you would like to read my comprehensive article on the kettle souring process, please click here!
If you would like to see more small batch recipes like this, please follow this link.
As I discussed earlier, I highly recommend “Gose: Brewing a Classic German Beer for the Modern Era” by Fal Allen to learn as much as you can about Gose as well as learning how to produce quality sour beer. Much of the information needed to produce this article came from this book, so thank you Fal!